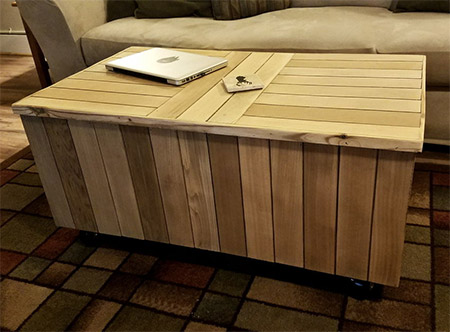
Reclaimed pallet coffee table with lift-top lid
Using reclaimed pallet wood to make this coffee table with lift-top is a great way to save money. Not only are pallets cheap, they’re also a great way to give new life to wood.

This reclaimed pallet wood coffee table seen on instructables.com has a lift-up top that reveals a large storage compartment below. If you make out of reclaimed pallet wood, the table shouldn’t cost much to make, and the mechanism to lift the lid is extremely simple, as you will see below.

YOU WILL NEED:
- Reclaimed wood for the frame, top and lift mechanism
- Reclaimed pallets for the cladding
- Wood glue
- Bolts, nuts and washers [8]
- Caster wheels
- Choice of finishing
TOOLS:
- Pneumatic nailer or hammer and panel pins
- Drill / Driver plus assorted bits
- Jigsaw
- Mitre saw
- Tape measure and pencil
HERE’S HOW:

Pine is the most common pallet wood that you’re going to find in South Africa, and because this wood is so soft, you’ll need to try to source pallets in the best possible condition. Take apart the pallets – you will find tips on working with reclaimed pallets here.

Using 120-grit sandpaper to achieve a reasonably smooth finish, and from there you can leave as is for a rustic table, or sand further with 180– or 240-grit sandpaper.

You will need reclaimed wood or pine PAR to make the frame for the coffee table, and you can make the frame to a custom size for your particular space. It’s also a good idea to work the size of the coffee table to the size and quantity of reclaimed pallet wood that you have. The frame for the coffee table shown here is assembled using a lap-joint method, where sections are removed to allow for overlapping joints.
BELOW: You can see the lap-joints at the corners where the front or back pieces join with the sides at the top of each leg.

Lifting mechanisms aren’t easy to come by, unless you are prepared to order from overseas and have shipped to SA. For this project a simple lift mechanism was designed to allow easy lifting of the top of the coffee table.

To make the lifting mechanism – and after several design attempts – two pivoting arms on both sides of the table would attach to cross supports. The lifting mechanism shown here will later be assembled using lock nuts, washers and bolts.

Test fit the lifting mechanism to your table to check the lift height and positioning and then cut everything to size. Assemble using bolt, washers and nuts and fit onto the previously assembled frame.

BELOW: Test to ensure that you lifting mechanism is the right height and that it folds flat within the table frame.


The base for the lid is a piece of 16mm plywood cut to fit and screwed in place.

The next step is to start adding the reclaimed wood cladding. The reclaimed wood used here is tongue and groove that previously encased a hot tub but you can just as well use any reclaimed wood to clad the coffee table.
Secure the planks onto the outside of the frame using wood glue and a pneumatic nailer or hammer and panel pins. You will notice that the planks on the front and back run vertically, while the planks on the sides are horizontal. This adds a bit of extra interest to the finished design.

To give the top of the coffee table a bit more of a finished look, a frame surrounds the top (attached to the plywood top that sits on top of the lifting mechanism). This frame has enough space to allow for fitting the top planks.

As mentioned above, we’re using reclaimed tongue and groove to clad our table. These were arranged in a vertical / horizontal design that was glued on top of the plywood – and inside the frame.

BELOW: The completed top section.

Adding caster wheels allows the table to be moved around, which is great if you’re also going to be using this as a work surface.

Now all that’s left to do is some sanding and the application of a sealer, varnish, oil or wax.


Comments
Add comment